Text and most images © Don Davis
On
Painting and animation techniques then and now
1. Traditional painting
The creation of convincing astronomical
images, especially those with hardware or other geometry requires
knowledge and use of perspective and lighting principals as well
as a working knowledge of the subject matter. Next comes mastering
the nuances of your medium of choice for your given pictorial
goals.
One reason I gave up oil painting was the hassle of
achieving even dark photographable blacks in that medium. Bonestell
excelled in this, thanks to the use of oils mixed with a painting
medium he preferred ( 2/3 turpentine, 1/3 sun thickened linseed
oil, a dash of Cobalt Drier) which if added to paint in sufficient
amounts can cause the brushstrokes to melt away before drying.
If time is not that important a few layers of such 'black' applied
in nearly liquid state can end up as a wonderful enameled like
surface which nowhere deviates from the horizontal by more than
a few degrees. This can be lit properly to show off the rich blacks
against the sunlit surfaces below. Smooth board panels or smoothly
sanded gessoed panels are the preferred painting surface with
this method. I have only done one oil on canvas painting with
the sky done this way, as many sanded gesso coats were required
before the sky could be even started.
Acrylics freed me of the black sky hassles ( I still
consider oils the ultimate traditional media!) but only with the
computer can I be sure the skies will indeed look black in the
final printed page.
Many variations of what constitutes 'black' are done, from straight
use of 'Mars black' pigments to mixing up lots of deep thalo blue
and umber colors, or otherwise trying to tap in on blue's 'receding'
property. Geoffrey Chandler prided himself on never using black.
I am inclined to agree that black pigment should be no more than
a third of the volume of the color mixture I use for my skies
(if I ever paint a traditional media picture again!)
One place in an artist's work that almost allows you
to look inside an artist's mind is the way they portray randomness.
Pattern dominates efforts to mentally process textures
into paintable forms, but the forces which scatter rocks, stars,
and clouds about don't often behave predictably. The discovery
(or invention) of fractal geometry is a landmark in perceptions
of nature whose properties can be applied to such random things,
and has provided new textural possibilities for our work as it
has for our way of seeing things.Looking at my work of 20 years
ago, my painted attempts at rocky surfaces now look weird to me,
perhaps the computer makes me want to steer away from stylization,
an impossible thing and undesirable in many cases.
I am a worshiper of the look of the hyperreal, the
'take off my glasses and explore closeup' the micro textures nearby
while the distant vistas peek from behind the nearby stuff. A
simple Lunar landscape is among the most challenging textures
to paint, from the scattering of the rocks to the soil details
between the rocks. In space the distant scenery is distinguished
by concentration of textures into other 'meta textures' in the
distance, and by superimposition.
The photos from the Apollo missions are our best record
of being on another world, the later mission's surviving video
records have much to offer on behavior of dust in a vacuum, gross
lighting characteristics and variety of scenery on the Moon. As
such exploration continues to recede into the mists of history,
these sources will only grow in value.
Getting an impression across through ones work of
an unfamiliar place is obviously one of the things a skilled artist
can do with a vast variety of approaches, the skill is in tapping
into the visual cortex in such a way as to create a visual language
most of the audience can 'read'.
Much of the work of such
paintings has traditionally been the preliminary sketches in which
the composition and lighting are determined. Perspective drawing
and shadow plotting techniques have provided the means of trying
out the effect desired within the chosen composition. For the
quarter century from the start of my professional painting career
in late 1968 until the beginnings of my use of the computer with
regularity, labor intensive perspective drawings of things like
spacecraft and planetary ring perspective views accumulated in
folders with each new painting. Now most such preliminary work,
as with the primary act of painting, has largely moved to the
computer.
The creation of a desired
element in a picture justifies any approach taken to achieve it. In
other words, if it works, do it.
When Chesley Bonestell wanted to paint the rings
of Saturn as a line or an extremely thin ellipse, a technical
pen like a rapidograph would be used to outline the critical region
as delicately as needed, then he would paint (with oils highly
thinned with a painting medium) up to the line.
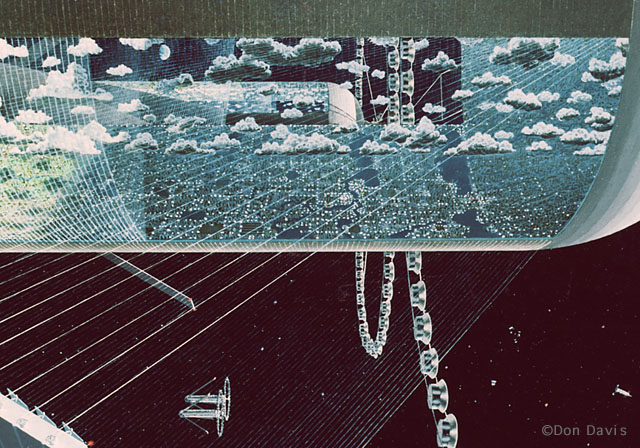
For a space colony oil miniature,
I opted to do it all in paint, including many cables nearly parallel
but showing noticeable perspective. After the background painting
was very dry, I hunched over the piece (about 12X16, oil on gessoed
Masonite) with a steel straight-edge suspended solidly on a knee
just above the painting. I had pecked tiny dots where each of
the cables began and ended, and anchoring my little finger on
the rulers edge I could glide my hand along just the right path
to let the fine brush paint a narrow line. This line had to be
thinner on one end to carry the desired impression of perspective.
Each cable had to be painted after shifting
the straight-edge and trying to insure just the right amount of
paint (of just the right consistency) was on the brush. During
the critical moments of painting the line the world disappears,
my being focused on becoming a precision machine. A mistake could
be wiped out with a 'Q-tip' dampened in turpentine, providing
the background is thoroughly dry.
Once layer 1 of the cables were dry, layer 2 could
then be safely painted! The results were....OK. Variations
of width were inevitable.
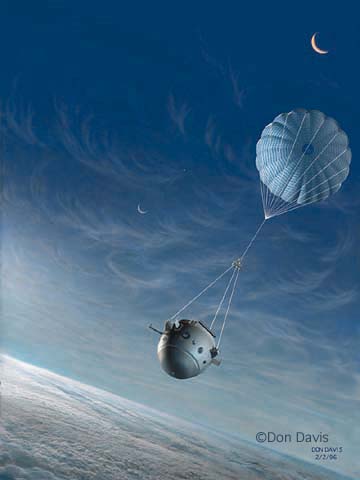
This is like a memory of a past life now, the turning
point for painting such things was my Galileo
cover for Sky and Telescope. The parachute lines were rendered
in 3D, and repainted in Photoshop. I wouldn't want to think of
doing them in traditional media, yet heroic effort used to be
part of such works. In the end I like the look of the computer
paintings for such hardware work.
A painter can create an image with an effective resolution
of, say, 2 pixels per millimeter (let's call that an average,
anyway) The standards for an acceptable print are a good deal
higher, roughly up to 10 pixels per millimeter.
When painting digitally, as I now do, it is important
to keep in mind the vast size such paintings must be to indure
good display prints and reproductions in print media. More new
work in shows will be digital prints, and there are advanced 'printers'
which even spray an image onto canvas and art board surfaces using
a digital file. I can see using such a device as an 'apprentice'
and finishing up the result by hand.
Over the years I became familiar with
the mathematical tools for calculating horizon distance, but I
never used them, and they lie buried among my copious notes. I
hated my math classes in public schools, and to this day I cannot
do anything but add, subtract, multiply and divide. Despite my
stunted math skills, I recognize the power and usefulness of mathematics
to our world and to such work as mine.
Now that I can 'look' at a virtual Earth with great
detail and create an instant 'perspective drawing' at a whim.
I can afford to try variations of views before committing myself. Only
the first preliminary drawings are still exclusively done by hand,
with my personal contribution to the painting concentrated on
the things computers do poorly or slowly such as various amorphous
details, and random things like rocks and other textures. Following
is an attempt to summarize some of my thoughts regarding the dawn
of the digital age in art.
2. Film and animation
When I became part of the Cosmos
team of artists in 1979, visual effects for films were still based
on traditional 'in camera' and model methods. Layering of images
beyond simple multiple exposures required the use of tricky and
very expensive optical printer work. At that time computer graphics
had just reached the stage of creating images of solid plastic
looking objects, but texture mapping was just being implemented
and ray traced cast shadows were still some time in the future.
All the shots of the surfaces of
other planets required the production of 'tabletop' sized models,
some built after design drawings I prepared. Although I was in
charge of the planetary surface landscape models, all of the artists
had some overlap of skills and it was common to join in on each
other's projects to help get something done on schedule.
 Left:
three Cosmos artists pose for a Polaroid as the first planetary
landscape
Left:
three Cosmos artists pose for a Polaroid as the first planetary
landscape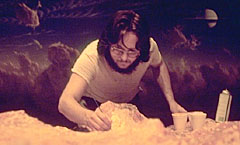 model, that of Titan,
begins to take shape. Left to right: Don Davis, Jon Lomberg, Rick
Sternbach.
model, that of Titan,
begins to take shape. Left to right: Don Davis, Jon Lomberg, Rick
Sternbach.
Right: I am painting 'lava' flow details on
postulated 'ice volcanoes', the older surfaces were imagined as
a reddish brown color due to continuous deposits of dark 'rain'
of particles.
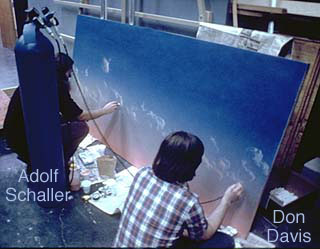 Left:
The background panel being painted, fortunately Adolf Schaller
and I handle clouds well enough we were able to create a work
of consistent quality. Most of the left side was painted by Adolf,
the right by me.
Left:
The background panel being painted, fortunately Adolf Schaller
and I handle clouds well enough we were able to create a work
of consistent quality. Most of the left side was painted by Adolf,
the right by me.
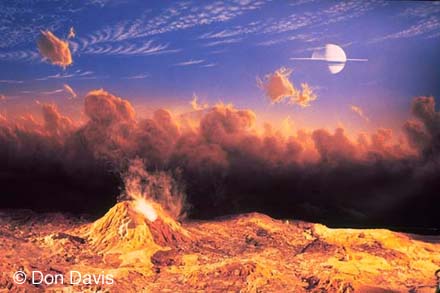
Below: The final painted backdrop behind
the finished model, ready for the cameras, rigged with tubing
for the bubbly vapor from the 'ice volcano'.
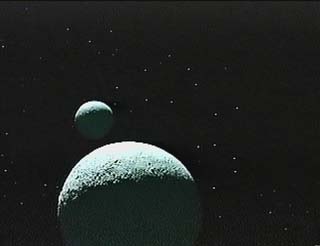
Many globes as well as planetary
surface models were made during the production. One shot was of
Pluto and it's then recently discovered moon. Charon. Two globes
were set up in front of a large sky backdrop made of perforated
opaque black sheets attached to a large sheet of frosted plastic,
strongly backlit with banks of lights. The shot depended, of course,
on the smoothness of the camera move as it was wheeled and moved
on it's crane.
Below left: the models, right: How the shot
appeared in the series 'Cosmos'.

3. The computer emerges.
 My first
peek at a good computer paint system was in 1981, when I was asked
to paint a series of texture maps of Saturn, the outer planets
and some of their moons for the use by the Jet Propulsion Laboratory
in upcoming Voyager encounter animations.
My first
peek at a good computer paint system was in 1981, when I was asked
to paint a series of texture maps of Saturn, the outer planets
and some of their moons for the use by the Jet Propulsion Laboratory
in upcoming Voyager encounter animations.
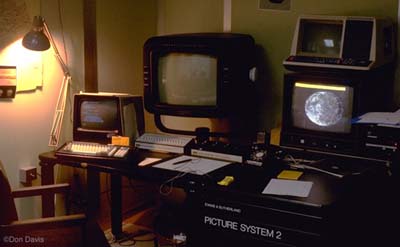
At that time Jim Blinn, the originator
of many of the texture mapping methods now widely used, was working
at JPL and had written much of a then sophisticated painting program
which used an electronic stylus (with a cord attached) to apply
painting, or rather scratching motions on a flat 'tablet' which
caused blobs of a chosen color to instantaneously appear on a
monitor facing me, a miracle to behold then. Both Jim and Pat
Cole, another CGI pioneer, coached me in using the equipment.
Rick Sternbach had used the same system to create
texture maps for the earlier Jupiter encounter.
Unfortunately such systems were one of a kind major
setups then, a few years later the Quantel Paintbox was the best
electronic paint tool. Used for retouching of video elements,
time on such a system was fantastically expensive. A comet animation
sequence for the 1986 reissue of Cosmos was one of the few occasions
I actually got to paint for extended times on one. I had painted
with acrylics on acetate cels several comet landscapes which were
then shot on video and captured as high quality frames in the
Paintbox. I then painted with the electronic stylus many layers
of gas jets expanding and fading on frame after frame, which were
later cross dissolved in a video editing suite to create an animation
of dynamic erupting jets.
The first home computer I saw which allowed one to paint pictures
with a mouse was an Amiga in 1984, and I was not encouraged by
what I saw at that time.
Later glimpses of what Joel Hagen was able to create on an Amiga
nearly lured me to that platform, but fate intervened.
My 3 years career at Hansen Planetarium
in Salt Lake city started in 1987. During the process of my learning
the various aspects of show production I began my first continuous
relationship with computers. The Digistar computer graphic projection
system allows users to create detailed 3 dimensional models made
of lines and dots using a 'puck' (fancy mouse with cross hairs)
to trace outlines and contours while adjusting the 'working plane'
with a dial with the other hand to define where in the third dimension
the next line or dot will be placed. The show production dept.
purchased a number of Macintosh computers, and I was encouraged
to learn to operate them. After my first rocky encounter with
the UNIX operating system used by the VAX computer which powered
the Digistar, I found the Mac's intuitive approach a joy to use.
The first machine I began to play with was a Mac II with 8 bit
color, with I believe 8 megabytes of RAM, and an early paint program
called Pixelpaint. I learned to work around it's limitations and
create some images worth using. One Pixelpaint drawing tool in
particular, meant to simulate charcoal rubbing, was capable of
surprisingly subtle textures. During a visit by David Egge, it
was a delight to see how he became entranced with this same tool.
He sat until the early morning hours one weekend, building
up in rubbed textures a Mars landscape. One observation he made
then was that trying to paint with a Mouse was "like trying
to draw with a bar of soap", which I heartily agree with.
Later the Planetarium bought a crude scanner and an early
tablet, which allowed me to establish the rudiments of computer
assists for certain aspects of my art.
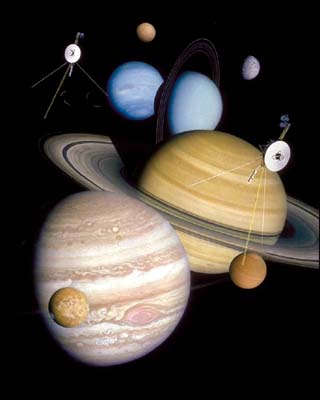 A series
of planet images were needed for a painting for JPL celebrating
the Voyager encounters, and for this painting I first used the
computer to generate a series of perspective views of the ringed
planets using a rudimentary modeling program called Mac3D, these
were photocopied to the desired size then taped together. I then
laid a sheet of tracing paper over this comp, and while producing
my 'master drawing' I would by hand smooth out the curves made
of many straight line segments making up a ring model, for example.
A series
of planet images were needed for a painting for JPL celebrating
the Voyager encounters, and for this painting I first used the
computer to generate a series of perspective views of the ringed
planets using a rudimentary modeling program called Mac3D, these
were photocopied to the desired size then taped together. I then
laid a sheet of tracing paper over this comp, and while producing
my 'master drawing' I would by hand smooth out the curves made
of many straight line segments making up a ring model, for example.
I could then cut out the separate friskits of the
planets and rings from copies of that drawing and went at it with
the air and paintbrushes. This acrylic on illustration board is
the result.
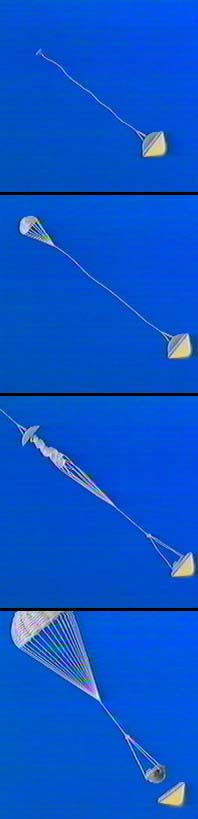
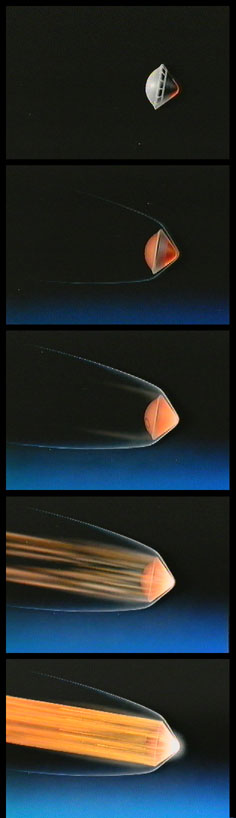 At
the time I was also working on an animation of the Galileo probe
entering the atmosphere of Jupiter, and simple models of the spacecraft
were made in the computer to allow accurate views to be rendered
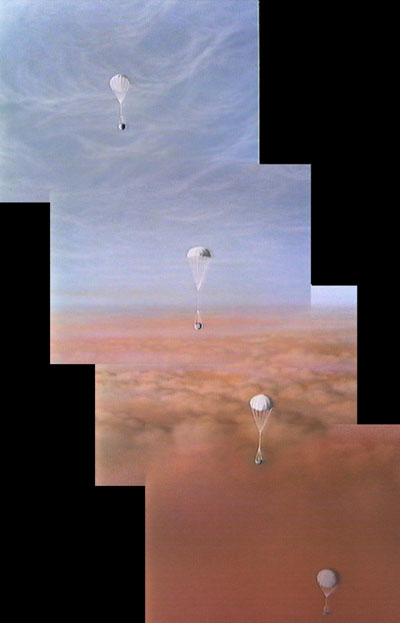
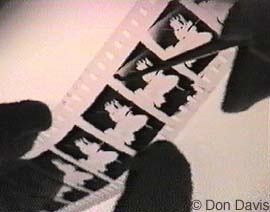
and then traced on acetate cells from various angles. For
the probe entry sequence (left), I had to paint the fiery ablation
from the heat shield on hundreds of acetete cels. The sequence
of the probe deploying the parachute (right) also involved many
drawings, the parachute cords were all drawn on acetete with a
'rapidograph' pen using white ink. All sequences tried to follow
accurately the appearence and timing of the events in the entry
sequence.
At
the time I was also working on an animation of the Galileo probe
entering the atmosphere of Jupiter, and simple models of the spacecraft
were made in the computer to allow accurate views to be rendered
and then traced on acetate cells from various angles. For
the probe entry sequence (left), I had to paint the fiery ablation
from the heat shield on hundreds of acetete cels. The sequence
of the probe deploying the parachute (right) also involved many
drawings, the parachute cords were all drawn on acetete with a
'rapidograph' pen using white ink. All sequences tried to follow
accurately the appearence and timing of the events in the entry
sequence.
One sequence in the animated short (below)
used over a hundred 'Mac 3D' renders of a slowly shifting perspective
as the templates for the hand painted cels of the probe drifting
down near us from overhead. These frames were patched together
from a move which panned as it tilted, thus the black areas outside
the shot. This animation was the last time I used 35 mm movie
film as a primary medium. I painted, designed, and shot the film
myself, at times using 'bi-pack' mattes to combine foreground
action onto backgrounds.
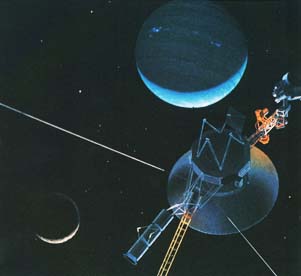 During the Voyager
Neptune encounter I was in transition between Salt Lake city and
the Los Angeles area. I was starting to work for WQED science
effects, an effects house used for science related Public Broadcasting
shows such as 'Infinite Voyage', and 'Space Age'. At left is a
painting of the Voyager Neptune encounter, one of a series commissioned
by Charles Kolhase of the Jet Propulsion Laboratory of each of
the first Voyager encounters of the outer planets. All were based
on printouts of 'line drawing' representations of actual views
the spacecraft would see.
During the Voyager
Neptune encounter I was in transition between Salt Lake city and
the Los Angeles area. I was starting to work for WQED science
effects, an effects house used for science related Public Broadcasting
shows such as 'Infinite Voyage', and 'Space Age'. At left is a
painting of the Voyager Neptune encounter, one of a series commissioned
by Charles Kolhase of the Jet Propulsion Laboratory of each of
the first Voyager encounters of the outer planets. All were based
on printouts of 'line drawing' representations of actual views
the spacecraft would see.
During my career at WQED the transition
began in earnest in visual effects creation strategies from the
use of physical models and camera tricks to the growing digital
options. John Allison, a Cosmos veteran, headed the visual effects
facility in a converted warehouse in Glendale. We worked and played
hard there.
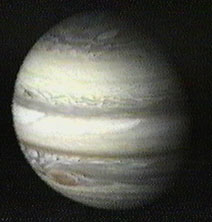
This is how we used to 'texture map'
a planet map onto a sphere before the days of computers! We prepared
an animated map of Jupiter's clouds, modified a 'wall' 35mm camera
to project the developed film onto a carefully aligned spheroid,
and filmed the result with our motion control mounted Mitchell
camera. In the case of Jupiter the limb darkening was even simulated
by a weak blue gel filter with a hole cut in it so when carefully
positioned in front of the light only the edges would be affected
from the camera point of view.
In other cases realistic painting or
modeling would be simply applied over a specially prepared globe,
such as this 12 inch earth globe I painted for the PBS 'Planet
Earth' series in the mid 1980's.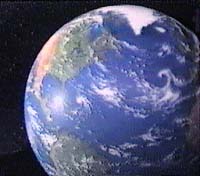
 Many of these shots were simple
moves near the models against a backlit perforated black wall
such as had been employed during 'Cosmos'. Some shots, however,
required the use of 'mattes' to selectively expose parts of the
film at a time. These were prepared and literally sandwiched onto
the color film in the camera, using the precise, relatively cheap,
and very labor intensive 'bipack' method. A special 'double decker'
film magazine was required for this process, with one set of reels
holding the color film which was exposed twice in the long process,
the other set of reels holding the black and white film. Often
parts of the surroundings had to be painted out directly on the
film using a brush and opaqueing fluid, one frame at a time!
Many of these shots were simple
moves near the models against a backlit perforated black wall
such as had been employed during 'Cosmos'. Some shots, however,
required the use of 'mattes' to selectively expose parts of the
film at a time. These were prepared and literally sandwiched onto
the color film in the camera, using the precise, relatively cheap,
and very labor intensive 'bipack' method. A special 'double decker'
film magazine was required for this process, with one set of reels
holding the color film which was exposed twice in the long process,
the other set of reels holding the black and white film. Often
parts of the surroundings had to be painted out directly on the
film using a brush and opaqueing fluid, one frame at a time!
We soon realised that computer graphics
had not only evolved geatly in the last few years, they were becoming
available in affordable equipment and software. As soon as we
could we tried to 'automate' some of the tasks we were spending
days at a time on in some cases. We bought a Mac II FX, with the
then maximum RAM of any Mac at that time of 32 megabytes as well
as 24 bit color on a large monitor.
 While at WQED
I learned Electric Image, then and still the best Mac rendering
and animation software. I also learned Adobe Photoshop, still
my favorite digital paint software. By then the painting and animation
capabilities available to users of such affordable home computers
had surpassed that of the original system I had painted the Voyager
texture maps with at the beginning of that decade. The
cheaply available electronic stylus now was not only cordless,
but pressure sensitive as well, allowing great subtlety in the
'brushwork'. I produced my first computer animation on the Macintosh
2 FX, of a proposed satellite called EOS.
While at WQED
I learned Electric Image, then and still the best Mac rendering
and animation software. I also learned Adobe Photoshop, still
my favorite digital paint software. By then the painting and animation
capabilities available to users of such affordable home computers
had surpassed that of the original system I had painted the Voyager
texture maps with at the beginning of that decade. The
cheaply available electronic stylus now was not only cordless,
but pressure sensitive as well, allowing great subtlety in the
'brushwork'. I produced my first computer animation on the Macintosh
2 FX, of a proposed satellite called EOS.
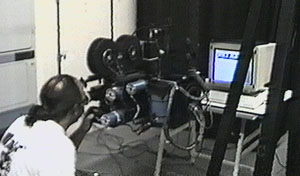
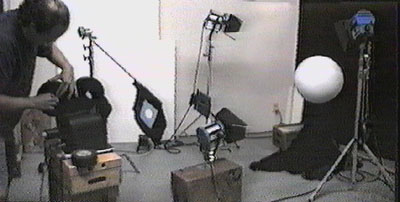
In order to get these early sequences
on film quickly we would actually set up the motion controlled
camera to look at the screen, and after trying out various contrast
adjustments and filter combinations we were able to obtain acceptable
video res 'film transfers' using this decidedly transitionary
method! Here John Allison makes the final adjustments before starting
the shot. During the cycle of exposing a frame in the camera
the computer in the camera system would send a pulse the Mac was
made to read as a 'mouse click', causing the next frame to appear
in the sequence. We would start a shot and leave the room until
the it was done.
4. The computer as a painting tool
Despite the traditional minority following
of Apple, the Mac is the artist's computer as shown by the migration
of large numbers of graphics people to that platform. The fact
is, however, that clever people can do great work on any of the
major platform choices. I now make virtually all my living with
my computer, my drawing board is used more for retouching damaged
old works and the preparation of that 'extra special' large painting
I keep promising myself I'll do.
Certain trends and changes in the methods of creating
images come to mind that digital media has imposed on the process.
The act of painting on the computer is at first totally alien
to the traditional tactile nature of creating art. The mark produced
is in a totally different place than where the 'pen' touches the
'drawing surface'. In a way, when I learned the use of the Passche
AB airbrush, I had to conquer a similar disturbance at seeing
a mark appear 'off axis' from the tool I was holding!
The Photoshop airbrush is quite good, and if used
at a very low percentage value a good varied buildup can be achieved.
Part of the effectiveness of computer airbrush
effects lies in the number of brightness levels available in the
picture. The current standard for home computer graphics is 24
bit, meaning 16,777,216 colors can be shown at any one time on
the screen.
I am told the human eye is capable of distinguishing
some 50 million colors or so, crowded in sensitivity along the
yellow to green transition of the spectrum. Thus 24 bit color
(and more so the larger color numbers used in high end digital
color work) approaches the ability of the eyes to perceive colors.
There is an important caveat to this, the limitations in the monitors
to accurately convey all the colors in the spectrum.
The color phosphors hit some parts of the spectrum
nicely and miss others badly, a particular example being the green
to blue portion. In order for the full color potential to be realized,
a high quality print or transparency must be prepared from the
picture file. Most monitors are tuned way too bright,
ideally areas of black in a picture should emit no light at all.
For visual relief the computer should be in a room where at least
one incandescent light falls across the walls, but not on the
screen. This supplies continuous light, that is a non flickering
illumination which will cover much of the visual field and reduce
the screen's fatiguing effects on many people due to it's own
subtle flickering.
With the advent of multi-layering in paint programs
new techniques of painting suggest themselves. a set of highlights
on a rocky hill can be painted atop another layer, then that layer
separately dimmed to see how a softer lighting would look.The
entire project can be saved at critical points to allow fearless
exploration that the traditional media of no return can restrict.
It seems that indeed the process of creating
an image is mutating beyond all bounds.
The use of the computer to do the perspective and part of the
lighting setup for certain hardware paintings has advantages in
that much of the perspective plotting 'donkey work' is now done
by the machine, allowing me to concentrate on painting the 'personal'
touches that distinguish the image from a purely CGI look.
For a digital painting of
the Galileo probe separating from the orbiter commissioned by
NASA, I built in a 3D modeling program a complete Galileo orbiter
and probe, taking care to show the thermal coverings over the
instruments, the partly open antenna, etc. spending the better
part of a week on it. I then assembled the model within the Electric
Image software with appropriate color values assigned to the various
surfaces. No texture maps were applied, the idea was to compose
the picture and determine the lighting scheme.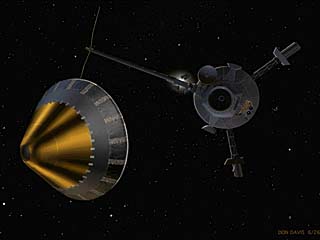
Once I liked an angle, a simple wire frame render
was done of the spacecraft, black lines on white paper. This was
then faxed to NASA for approval. As things turned out, they didn't
like that or the second compositions, but because I could quickly
generate other angle views the third try faxed in that day did
the job.
Already the work of building the 3D model had been
justified.
Next a large (4096 pixels wide) image of the nicely lit model
was rendered in Electric Image, and the next 3 days were spent
painting on top of that render all the extra details specific
to that view using photos of the spacecraft as reference.
I thus let the computer do the work up to a point,
then took over where the human touch mattered the most, what is
normally the last ten percent of the work.
I think that even without significant painted embellishment, most
hardware art could now be done by machine, saving the inspired
painted images of that genre to people like Paul Hudson who continue
to display the inherent superiority of talented artists over imagery
created by people working in the realm of technology more than
technique.
Despite my absolute embracing of digital painting,
there are still pangs of regret in the demise of physical painted
surfaces as my primary technique, and I hope that traditional
media won't soon be forgotten. So much of a fine painting is not
reproducible on a phosphor monitor or even a high quality print.
The inner light of the fiery glazed painted surface
transcends the cold digital palette. A projected slide of a fine
painting shot in polarized light will surpass in richness and
subtlety all but the most expensive digital efforts to show the
same painting.
Ideally the computer is to be regarded as only another
tool to convey our inner visions to the world.
It is still necessary to learn perspective drawing
and how to draw by hand the things we see. Perception is sharpened
as we grapple with understanding and processing on a visual level,
then define our own understandable visual language to communicate
ideas with markings on a surface.
And yet the writing is on the wall. Ours is the last
generation to regard doing artwork in terms of purely physical
media.
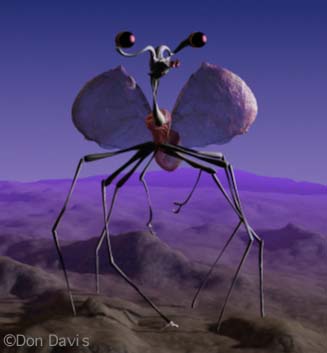 Below:
an animated 3D model of an alien insect like animal which evolved
on a low gravity earthlike world, done for the Learning Channel
series, 'Cosmic Safari', produced by Invincible films in London.
Below:
an animated 3D model of an alien insect like animal which evolved
on a low gravity earthlike world, done for the Learning Channel
series, 'Cosmic Safari', produced by Invincible films in London.
